Chocolate Peanut Butter “Puppy Chow” Popcorn
There’s something about Puppy Chow (or Muddy Buddies!) that feels like pure childhood joy — the chocolate, the peanut butter, that little dusting of sweetness. I’ve always loved it… so naturally, I had to reimagine it in popcorn form!

Save this recipe for later!
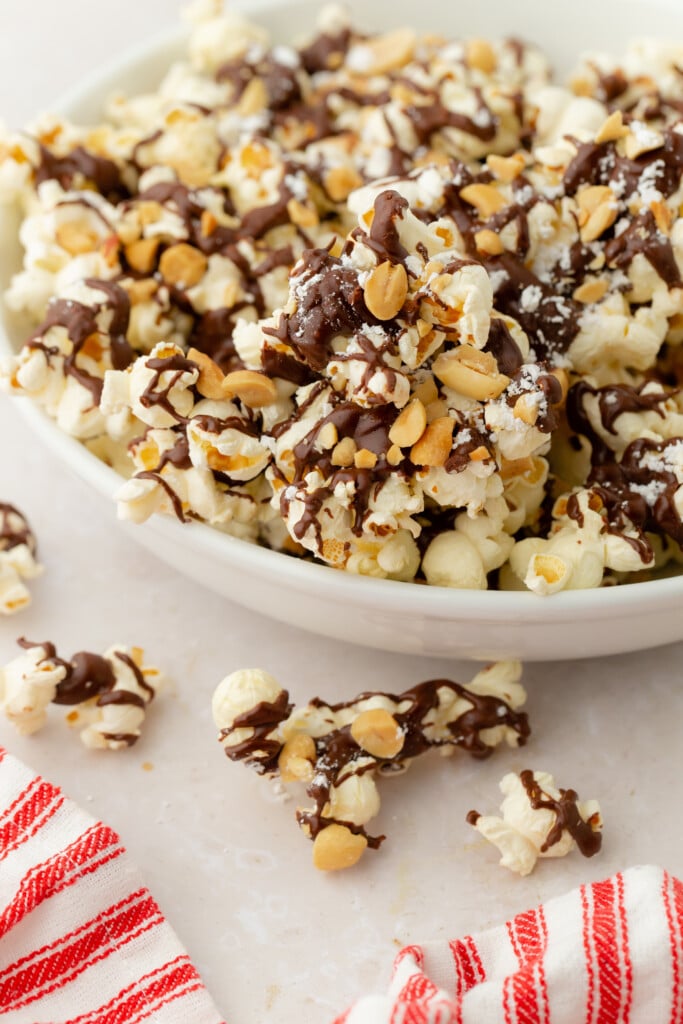
Say hello to Chocolate Peanut Butter Puppy Chow Popcorn — a sweet and salty, chocolatey treat that’s fun to make and even more unbelievably fun to eat. It blends the nostalgia of classic Puppy Chow with the whole grain crunch of popcorn, giving you the best of both worlds in every handful.
And if you agree that PB & C (chocolate) is basically the sweet-tooth sibling of PB & J, take a peek at my Chocolate Peanut Butter Crispy Bites, Chocolate Peanut Butter Crunch Cups, Chocolate Peanut Butter Fudge Bites, and a JB classic, my Chocolate Peanut Butter Dates (aka Snickers Dates) — it’s been a very peanut-butter-and-chocolate season in my kitchen!!
This recipe comes together quickly, but here’s 2 important things to know!
- Setting Tip: To keep the popcorn delightfully crisp, the setting step matters. Popcorn is delicate and can turn soft if it spends too much time in the fridge, so be sure to follow the firming notes before you start. They’ll help you achieve perfect, crunchy, chocolate-coated popcorn every single time. Once everything sets and you break it into pieces, get ready… people pounce. It’s crazy good!
- Vanilla Extract Tip: Most vanilla extracts are alcohol-based and melt in perfectly into the warm combo of chocolate chips and peanut butter. But if your vanilla is water-based or imitation, it can cause the chocolate to “seize” — that’s when smooth, glossy chocolate suddenly turns thick, grainy, or clumpy. It happens when even a tiny bit of water hits melted chocolate. To avoid this, just check your vanilla label: if the first ingredient is alcohol (often labeled “ethyl alcohol” or simply “alcohol”), you’re good to go (that’s what I use). If it lists water instead, stir the vanilla into the peanut butter before melting, so everything blends smoothly. And if you’d rather skip the vanilla entirely, that works too — your popcorn will still taste incredible. More about this in the notes section below!
Try my Caramel Popcorn next!

Chocolate Peanut Butter “Puppy Chow” Popcorn
Ingredients
- ¾ cup semi-sweet or dark chocolate chips
- 2 tablespoons creamy peanut butter
- ½ teaspoon vanilla extract
- 6 heaping cups light popcorn, air-popped or store-bought
- ⅓ cup roasted salted peanuts, roughly chopped
- 1 tablespoon confectioners’ sugar
Instructions
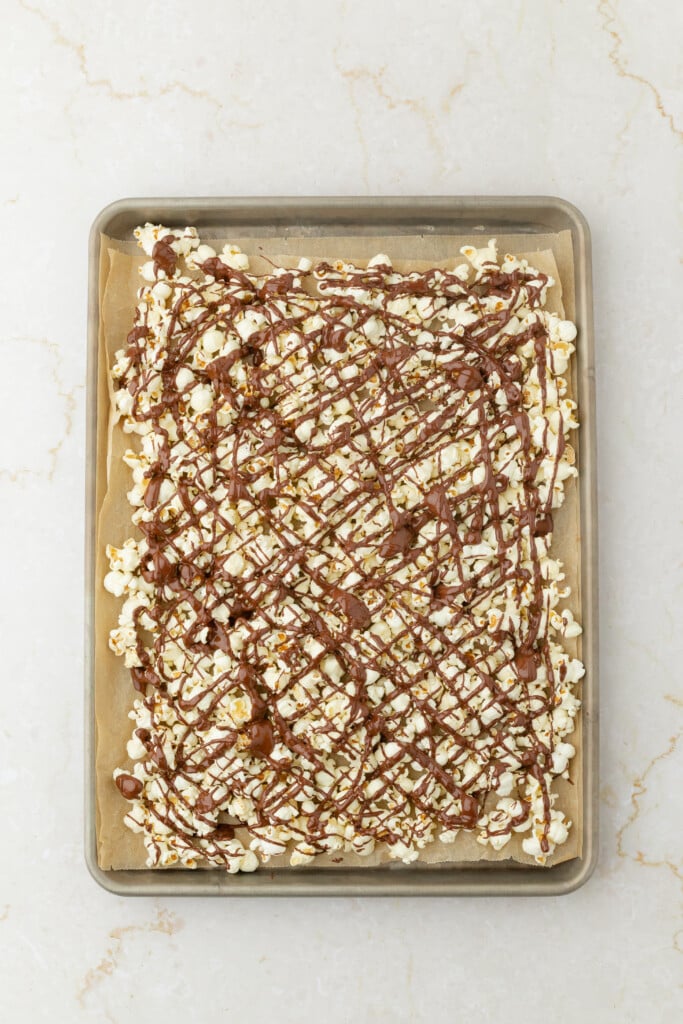
- Melt the chocolate + PB: Add chocolate chips and peanut butter to a microwave-safe bowl. Microwave in 20–30 second intervals, stirring between each burst so the chocolate doesn’t scorch. Continue until smooth and completely melted. Stir in the vanilla extract.
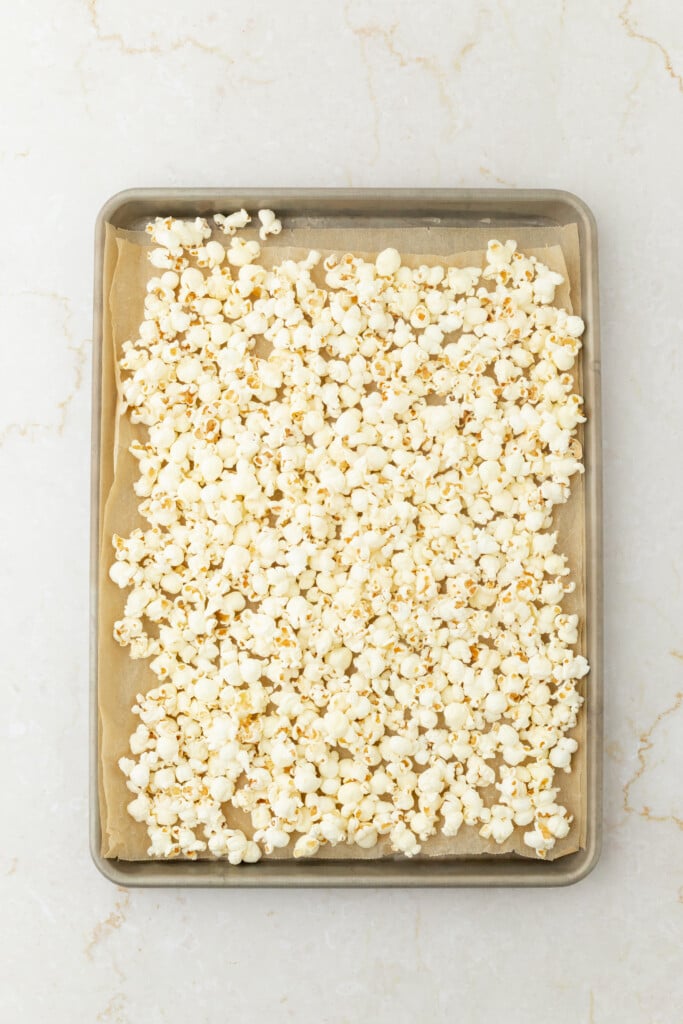
- Prep the popcorn: Spread the popcorn onto a large parchment-lined baking sheet in as close to a single layer as possible.
- Drizzle with chocolate: Using a spoon or spatula, drizzle the warm chocolate-peanut butter mixture over the popcorn in zig-zags until everything is generously coated. Don’t worry about being neat — artistic drizzling makes it look fabulous!
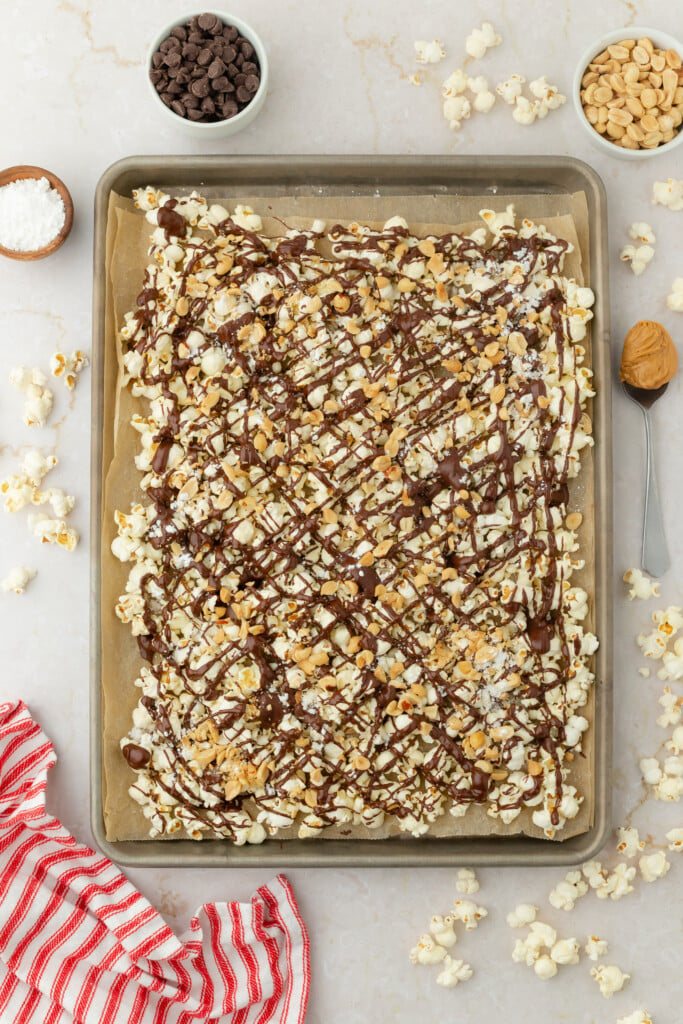
- Add toppings: Sprinkle the chopped peanuts evenly over the surface. Finish with a light dusting of confectioners’ sugar.
- Let it set (this is important for crispness!):For crunchy popcorn, allow the tray to sit undisturbed at room temperature for at least 60 minutes, or could be less if your kitchen runs cool.Tip: Chocolate mixed with peanut butter takes extra time to firm, so don’t rush it.Quick-set option: If you need it sooner, place the tray in the freezer for 5–7 minutes (NOT the fridge!). This hardens the chocolate quickly without exposing the popcorn to refrigerator humidity, which can make it soggy. Avoid the fridge, as it often softens the popcorn!
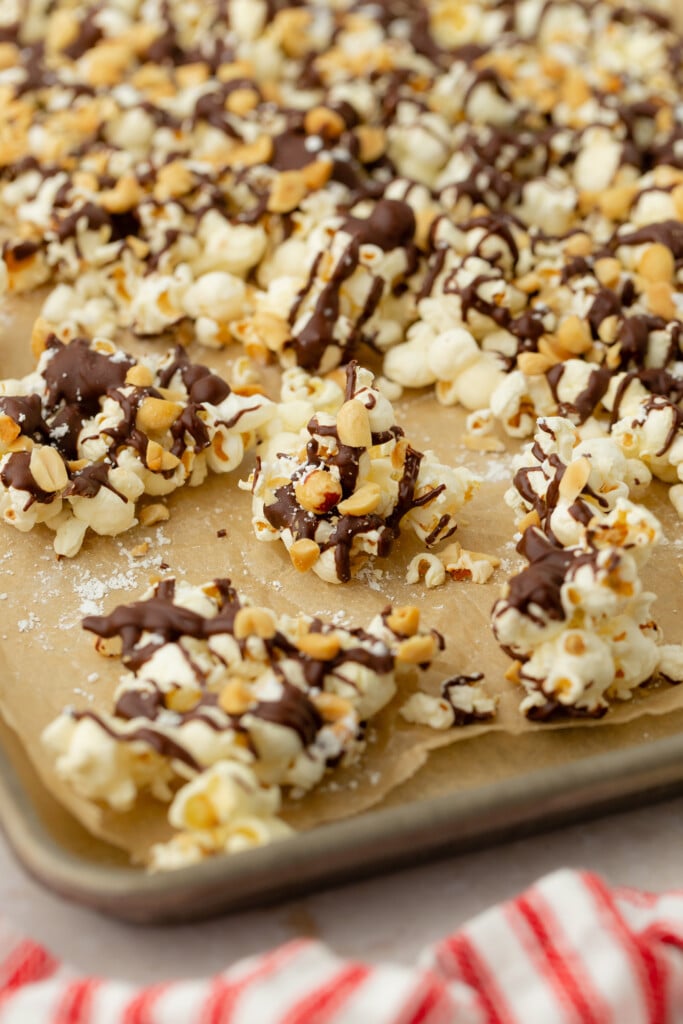
- Break + enjoy: Once fully set, break the popcorn into artisanal pieces — as big or small as you’d like. Pile into a bowl or platter and dig in!
Notes
Popcorn is naturally absorbent — it soaks up moisture from the environment. Refrigerators are especially humid, which can soften your beautiful chocolate-coated clusters. Here’s how to keep every bite light and crunchy:
- Fast method: Place the tray in the freezer for 5–7 minutes (do not leave it longer than 7 minutes!). This firms the chocolate quickly without adding moisture. Once the chocolate is firmed, immediately take it out and let it sit on the counter until you’re ready to serve. Avoid the fridge: Even a short chill can soften the popcorn.
- Longer method: Let the popcorn set at room temperature for at least 60 minutes (could be less if your kitchen runs cool). Because we’re mixing chocolate with peanut butter, it naturally takes extra time to firm — this is normal!
Vanilla extract guide (*Important for best results!): “Seizing” happens when melted chocolate comes into contact with water — it suddenly becomes thick, grainy, or tight instead of silky. Most store-bought vanilla extracts are alcohol-based, which do not cause seizing. But some imitation or “water-based” vanillas can. Here’s how to check your vanilla:
-Look at the ingredient list. If the first ingredient is alcohol (often labeled “ethyl alcohol” or simply “alcohol”), you’re safe to follow my directions for adding it directly to the melty chocolate–PB blend. -If the list starts with water, or if it says imitation vanilla, it may cause the chocolate to seize. So follow this workaround instead: Mix the vanilla into the peanut butter before melting. The fat protects the chocolate and prevents clumping. Or simply skip the vanilla entirely — the chocolate–peanut butter flavor is still rich and delicious without it. Make It Gluten-Free: Use certified gluten-free popcorn and check that your chocolate chips are labeled GF. Make It Dairy-Free / Vegan: Choose dairy-free chocolate chips Nut-Free Swap: Replace peanut butter with sunflower seed butter and use pumpkin seeds instead of peanuts. Fun Add-Ins: Toasted coconut flakes or freeze-dried strawberries (PB&J vibes!)

Sounds fabulous so I’d love to share. Would it work to make ahead a few days, store in glass containers, and give as Christmas gifts?! Thanks!
Hi Rebecca! It can last up to 3 days, but for guaranteed crunch, I recommend making it 1–2 days ahead — that’s the sweet spot.
A few key things to know:
-If you’re popping your own corn, be sure it’s completely cooled before adding the toppings. I typically use store-bought bagged popcorn, so this isn’t an issue.
-After adding your toppings, make sure the chocolate–PB coating is fully set and hardened before breaking it apart and packing it up. (My freezer method works great!)
-Store in an airtight glass container, both at home and when gifting.
-One last thing that’s optional but helpful: Place a small piece of parchment on top before sealing to absorb any stray moisture and help maintain that crisp texture.
Follow these steps and it should stay wonderfully delicious. Just aim for that 1–2 day “make-ahead” window for best results!
You’re so thoughtful and your recipients will love this gift!! xx
Absolutely perfect! I added a sprinkle of dried strawberries from trader Joe’s! Deliciousness!
Wow Debz! Thank you so much! That sounds like such a delicious addition! Thanks for sharing! — Eliza (Team Joy)
Ohhh I love this, thank you!! And the addition of dried strawberries sounds delicious! I’m so grateful you tried the recipe, Deb…and shared your upgrade. Now I need to make a batch with strawberries ASAP!
What can you use if you don’t have confectioner’s sugar on hand, or can I just skip that ingredient?
Just skip it, Beth! I use such a small amount and it’ll be delicious without!
You instruct to “Let the popcorn set at room temperature for at least 60 minutes (longer if your kitchen runs cool).” Wouldn’t it take a shorter time to set if your kitchen runs cool? Regardless, this sounds like a great recipe I’d like to try.
You’re so right, haha, thanks for catching that — fixing now! Sometimes I type too fast!!
If I make my own pop corn (kernels popped plain) should I add salt somewhere that I am not getting by making my own rather than a packaged version of the pop corn? Thank you for noting to let it cool completely before adding the chocolate mixture.
Hi Kerry! If you make your own popcorn, yes, you should add salt to your popcorn for the perfect sweet-salty flavor! — Eliza (Team Joy)
Love this recipe! It’s easy and yummy! Pretty healthy too! Thanks Joy!
Hi Betsy! Thank you so much for your nice note! So glad you loved this one. — Eliza (Team Joy)
I made this recipe exactly as written, using Ghirardelli Milk Chocolate Chips. While it was delicious, I found that the chocolate never really got hard and it left chocolate on your hands after picking it up. I decided to remake but this time instead of chocolate chips, I used Chocolate Almond Bark. Much better! Tasted great and it hardened up nicely. I’m not sure if was the kind of chocolate chips I used, or whether I did not properly melt them. Either way the Chocolate Almond Bark was easier & produced the desired results. A very delicious recipe!
Hi Lana! Thank you for sharing this—and I’m thrilled you loved the recipe (round 2)! What you experienced is likely because you used milk chocolate chips versus semi-sweet or dark. Milk chocolate chips are higher in sugar and milk solids, which means they stay softer at room temperature and can leave a little chocolate on your hands in no-bake treats like this. Nothing you did wrong at all!
Chocolate almond bark is actually a confectionery coating (not true chocolate), and it’s designed to set up firm and glossy without tempering, which is why your second batch hardened beautifully. It’s a very forgiving option for this recipe.
If you’re using true chocolate, here are my best tips:
-Skip milk chocolate and use semi-sweet or dark chocolate chips (they firm up much better)
-Melt the chocolate gently until completely smooth
-After coating the popcorn, pop the sheet in the freezer for 5–7 minutes, then let it rest on the counter—this helps the chocolate set nicely without over-chilling. You’ll notice this technique in my notes section of the recipe.
Thank you for sharing your experience! It’s incredibly helpful for others making this recipe! xx
Great recipe! I made It for a holiday treat. I omitted the vanilla. Next time I’ll sprinkle the peanuts over the popcorn, then drizzle the chocolate to make the peanuts stick better. I used dark chocolate.
Thank you again!
Kathy
Hi Kathy! So glad to hear that you enjoyed this recipe! Enjoy!— Eliza (Team Joy)
Can I use peanut powder instead of creamy peanut butter? How much?
Great question, MK! I haven’t personally tested this exact swap, but my gut says it should work best if you keep it simple. I’d recommend stirring about 1 tablespoon powdered peanut butter directly into the fully melted chocolate, with no added liquid. The water typically mixed with powdered PB can cause chocolate to seize, so skipping it is the safest bet. My only caveat is that the powder may thicken the chocolate slightly (that’s why I am suggesting just 1 Tbsp PB powder), which could affect how easily it drizzles…but using a small amount should keep it workable.
If you try it, I’d love to hear how it turns out!!
Thinking of adding some crushed peppermint candy canes. Thoughts?
Absolutely—it’ll be delicious and super festive! You can either swap the peanuts for crushed candy cane or use a little of both for that sweet-salty holiday vibe. Just be sure to sprinkle them on right after you drizzle on the warm, melty chocolate, so everything sticks perfectly!
Absolutely delicious!!! So easy to make. Merry Christmas Joy to you and your family ❤️ Thank you for all your great recipes!!!!
Oh Diana, this made my heart so happy!! I’m thrilled you loved this popcorn, and thank you so much for the sweet holiday wishes… Merry Christmas to you and your loved ones, too!! xx