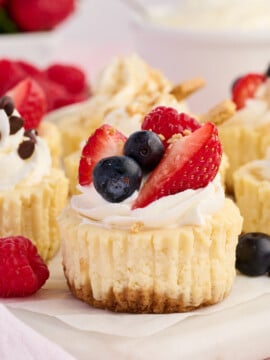
Easy Mini Cheesecakes with Graham Cracker Crust (Lighter Recipe)
Creamy, bite-size cheesecakes with a crumbly graham cracker crust and playful toppings—perfect for parties, holidays, or anytime a craving strikes.
Ingredients
For the graham cracker crust:
- 4 full sheets graham crackers, finely crushed
- 2 tablespoons butter, melted
For the cheesecake filling:
- 1 cup (8-ounces) light cream cheese, softened to room temperature
- 1 cup part-skim ricotta cheese
- ⅓ cup sugar
- 1 teaspoon vanilla extract
- 1 teaspoon fresh lemon juice
- ½ teaspoon lemon zest, zest the lemon before juicing
- ¼ teaspoon kosher salt
- 1 large egg, at room temperature
- Optional toppings: fresh sliced strawberries or other berries, crushed graham crackers, shredded coconut, whipped cream, or semi-sweet mini chocolate chips
Instructions
- Preheat the oven to 325°F. Line a standard muffin tin with 10 paper liners and lightly mist the insides of the liners with nonstick oil spray (this helps them peel away cleanly later).
Make the crust
- Add the graham crackers to a food processor and pulse into fine crumbs. Finer crumbs make a crust that holds together better. Pour in the melted butter and pulse again until it's mixed through. Remove the blade and use a spoon to stir in any butter that got trapped underneath, until all the crumbs are evenly moistened and look like wet sand. (No food processor? Crush the graham crackers in a bowl with the bottom of a sturdy mug, then stir in the melted butter.)
- Divide the crumb mixture evenly among the 10 liners. Press each one firmly into an even layer with the back of a spoon. Bake for 5 to 6 minutes, until fragrant and lightly golden. Make the filling while the crusts bake, then set the tin aside when they come out (keep the oven on).
Make the filling (choose your method)
- Food processor or blender (my favorite no-mixer method): If you used the food processor for the crust, give the bowl a quick rinse and dry, or skip it entirely. A few graham crumbs in the batter are no problem. Add the softened cream cheese, ricotta, sugar, vanilla, lemon juice, lemon zest, and salt (everything except the egg). Process until completely smooth, about 30 to 60 seconds, stopping once to scrape down the sides if needed. Add the egg last and pulse just 3 or 4 times, until it's blended in, so the batter isn't overmixed.Hand mixer: In a large bowl, beat the cream cheese on medium-low speed for about 1 minute, until smooth. Add the ricotta and beat another minute, scraping down the bowl. Add the sugar, vanilla, lemon juice, lemon zest, and salt and beat until combined. Add the egg last and mix on low just until it disappears into the batter.By hand: In a large bowl, mash the very soft cream cheese with a sturdy spatula or wooden spoon, pressing it against the sides of the bowl until smooth and lump-free. Stir in the ricotta, then switch to a whisk and add the sugar, vanilla, lemon juice, lemon zest, and salt, whisking until smooth. Whisk in the egg just until combined.Whichever method you use, avoid overmixing once the egg goes in. Whipping in extra air causes the cheesecakes to puff up in the oven and then sink or crack as they cool.
Make the cups
- Spoon the filling evenly over the crusts, filling each liner all the way to the top, and smooth the tops with the back of a spoon. Gently tap the tin on the counter a few times to release any air bubbles. Carefully transfer the tin to the oven, keeping it level so the filling doesn't spill over. (You may prefer to set the muffin tin on a baking sheet to catch any drips.)
- Bake for 18 to 20 minutes, until the edges look set and the centers still have a slight jiggle when you gently nudge the pan. Don't wait for the centers to firm up in the oven; they'll finish setting as they cool and chill.
- Cool the cheesecakes in the muffin tin on a wire rack for 30 minutes, then transfer the tin to the refrigerator and chill for at least 2 hours, or overnight, until fully set.
- Once chilled, lift the cheesecakes out of the tin and peel away the liners (or serve them right in the liners for easy grab-and-go). Add your favorite toppings just before serving!
Notes
• The jiggle test. Perfectly baked mini cheesecakes look set around the edges with a small wobbly spot in the very center, like barely set Jell-O. If the whole surface ripples like liquid, give them 2 more minutes and check again. Overbaking is what leads to a dry, rubbery texture and cracked tops.
• Room temperature is key for the cream cheese and egg. Cold cream cheese won't blend smoothly and leaves little lumps in the filling. Set the cream cheese and egg on the counter about 30 to 60 minutes before you start. Short on time? Place the whole egg (in its shell) in a bowl of warm water for 5 minutes. This matters most if you're mixing by hand, since soft cream cheese is what makes a lump-free filling possible without a machine. • For the smoothest filling. Ricotta has a naturally slightly grainy texture. A food processor or blender takes care of that completely. If you're using a hand mixer or mixing by hand, beat or mash the cream cheese until smooth before adding the ricotta, and drain off any liquid from the ricotta before measuring.
• Topping ideas. Beyond strawberries, try fresh blueberries or raspberries, a spoonful of warmed fruit preserves, a sprinkling of mini chocolate chips, or a light drizzle of melted dark chocolate. For holidays, crushed peppermint (winter) or chopped sautéed apples with a sprinkle of cinnamon (fall) is festive and fun. Add toppings right before serving so they stay fresh and don't weep onto the cheesecake.
• Paper liners work best. Paper liners make for easy removal and serving. Silicone liners also work beautifully; just mist them well with nonstick spray.
• Make it gluten-free. Swap in gluten-free graham crackers, and double-check that your other ingredients are certified gluten-free, too.
• Make ahead and storage. Store the cheesecakes (without toppings) in an airtight container in the refrigerator for up to 4 days. To freeze, place the untopped cheesecakes on a tray in the freezer until firm, then transfer to an airtight container and freeze for up to 1 month. Thaw overnight in the refrigerator before topping and serving.
• Nutrition information is per mini cheesecake, without optional toppings.
Nutrition Information per serving
Serving Size: 1 mini cheesecakeCalories: 150Carbohydrates: 12gProtein: 6gTotal Fat: 9g— Unsaturated Fat: 4g— Saturated Fat: 5gCholesterol: 45mgSodium: 180mgFiber: 0gTotal Sugar: 7g— Natural Sugar: 2g— Added Sugar: 5g
Nutrition information is calculated using a leading industry software. That being said, brands can vary, and there may be slight fluctuations in the numbers.